Archive for January 2009

Saturday, January 31, 2009

crocheted towel holder pattern

After our last crochet-themed post, we had a few requests for the pattern to make this little crocheted towel holder. So here you go! I'll also put one up for sale in my Etsy shop if you just don't see yourself making one. Enjoy!

Towel Ring Pattern


Materials:
*Size H (5.00mm) crochet hook
*Two strands of cotton yarn held together (we like Lily's Sugar 'n Cream)
*Button (approx. 3/4" to 1")


Stitches used: hdc, crossed hdc (explained in this post), magic ring technique


Ring:
Using the magic ring technique, create ring and ch 2. Do 30 hdc around ring, sl st to first hdc. Turn. Pull yarn tail if needed to make ring tight, but not so tight that the stitches get bunched up.


Tab top:
Ch 2 (counts as first hdc), crossed hdc across. End with hdc in last st. Ch 2, turn. Repeat for 10 rows. Fasten off, weave in ends.


Fold tab over to top of ring. Position and center button under tab on first row of crossed hdc. Make sure it can squeeze between stitches (that's your makeshift buttonhole). Sew on button. Enjoy your towel ring!


P.S. We've had quite a few comments asking what the stitch abbreviations mean and other basic crochet questions. We recommend you ask a friend to show you the basics, and find a book or CD-ROM that explains the terms and stitches in detail before beginning our crochet projects. Although they're all quite simple patterns, we've found you'll only get frustrated if you haven't practiced the basics first!

share this on »
{Facebook} {Twitter} {Pinterest}
22 Comments

Friday, January 30, 2009

chocolate dipped cookies + an altered tin = heaven


Today we have what we call a mega post. A recipe PLUS a tutorial so you can deliver your treats in style! It may be a little long, but it's worth the read.

After Christmas we found several sizes of tins for only $.25 in the clearance aisle. Well yeah, look at it--it looks like it's worth about a quarter. But we're going to make it look like a million bucks.


Altered Tin Tutorial


What you'll need:
*Tin of your choice
*Sand paper
*Acrylic paint
*Mod Podge (or any other decoupage medium)
*Foam brushes
*Patterned paper
*Scissors
*Brayer (optional--for smoothing out wrinkles in the paper)

1. Sand your tin all over--this will help the paint adhere better.


2. Paint the outside of the tin with acrylic paint. Let it dry and apply additional coats if needed (this pink one took three coats to cover up the red plaid). We also painted the rim of the tin's lid. If you like, once the paint is completely dry you can sand the edges for a distressed, shabby-chic look as well.


3. Trace the tin on your patterned paper. Cut it out, just inside your line.


4. Apply a thin layer of Mod Podge (decoupage medium) to the back of the paper with a foam brush.


5. Position the paper on the tin's lid and use a brayer or the side of your hand to smooth out any wrinkles. Allow to air dry for about 30 minutes before proceeding.


6. Once you've given it time to dry, apply a thin layer of Mod Podge over entire outside of tin, everywhere you have painted or adhered paper. This will protect the paper and keep the paint from scratching off.


7. Line with tissue paper and fill with cookies, then replace lid and tie with a ribbon and tag (or don't). Give it away before you're tempted to eat them all yourself!

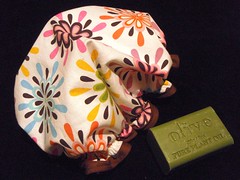
Here are a few other examples of altered tins we made for our Valentine's cookies.


And cookies aren't the only thing you can put in your tins for a sweet Valentine gift. How about candy or a stack of love coupons?

We also loved this cool way to alter larger tins (you know, the kind that come filled with flavored popcorn?). Pink & Polka Dot made gorgeous canisters out of them with just a stencil and some spray paint!

If you can't find cheap or used tins to re-purpose, check out Specialty Bottle for tons of different shaped "naked" tins.

Here's the easy shortbread recipe. If you don't like the traditional taste of shortbread, try leaving out the almost extract. Then it's more like a crunchy, yet buttery, sugar cookie. Dipped in chocolate. Either way, it's heaven.

Chocolate-Dipped Shortbread Recipe


4 cups flour
1 lb. butter
1 cup sugar
1 tsp. almond extract
1 bag Wilton Candy Melts or similar melting chocolate (we like "light cocoa" flavor)

Cream the butter and sugar, then add flour and mix well. Roll out on a lightly floured
surface and cut into desired shapes. Bake at 300 degrees for 25-30 minutes.
(Start checking after about 20 minutes. You want them to be just barely browning
around the edges.) Yields about 3 dozen cookies, depending on size of your cookie cutter.

Allow cookies to cool. Melt chocolate according to package directions. Dip half of each cookie in chocolate and place on wax paper to cool. When you start running low on chocolate, use a spoon to pour chocolate over cookies. Use the back of the spoon to smooth chocolate around until well-covered. Try not to eat too many before you pack them in your tins! They're addictive!

share this on »
{Facebook} {Twitter} {Pinterest}
39 Comments

Thursday, January 29, 2009

photography package winner!


We were so excited to host an awesome giveaway for a photography package and photo valentines from Your Every Color Photography here in Seattle. Andrea does amazing work--many of our readers said they were willing to travel to Seattle for her! So without further ado, our winner is. . .

Kim!

Okay, Kim, we don't have an e-mail or blog address for you, but you know who you are. Please e-mail the Little Birdies with your contact info and we'll pass it on to Andrea. Oh, and congrats! Your pictures will be beautiful!

And for the rest of you, don't forget Your Every Color is offering our readers a great coupon. Mention the Little Birdies and you'll receive $15.00 off your session fee, and a FREE 8x10!

share this on »
{Facebook} {Twitter} {Pinterest}
1 Comment

Wednesday, January 28, 2009

hospital essentials gift basket

The birdies looooove babies. I think we’ve mentioned that a few times in the past. We get so excited when a friend or family member tells us they are expecting. We love to spend our time crafting away in anticipation of a new little one. One of our friends is due soon and we’ve been busy making tons of cute baby items to welcome this adorable bundle of joy. But, wait! We didn’t forget mama (poor mama--once baby is here people tend to forget about her). So, we're putting together a little hospital basket to help her short stay a little more comfortable. Items that will go in this basket will be lip balm, lotion, facial towelettes, a favorite novel or magazine, gum, and mints. Oh, and of course we couldn’t complete a gift basket without one handcrafted item. House slippers! These were inspired by the travel slipper pattern in Michael Miller's book, Fabric Paper Party.


We whipped up our own little birdie version. We used some fabric scraps some extra-firm stabilizer for the foot base. These are perfect for wearing around the hospital room. I know I dislike those ugly gray socks they give you, and if you're already feeling less than pretty, the last thing you want to put on is bulky man-socks. We made sure that we used puff paint to paint designs on the bottom so the slippers would be non-slip. Hopefully we can make our friend’s hospital stay a little more stylish. These slippers are also a great idea for those of you going on long airplane trips.


Want a few more ideas for hospital gift baskets?

If you don't have time to sew slippers, how about this cute version of the hospital sock from Homemade by Jill?


Who wants to worry about doing their hair in the hospital? We love this pretty fabric headband from Heather Bailey. She has a free pattern for it! How fun would it be to give matching slippers and headband?

And for short stays, it would be nice to have a cute shower cap, so they can take a shower without having to wash and dry their hair. Hoppo Bumpo has a free pattern for an adorable cap.


Make up a cute hospital kit like this, and you'll be one visitor who'll be allowed to stay past visiting hours!

share this on »
{Facebook} {Twitter} {Pinterest}
12 Comments

Tuesday, January 27, 2009

crossed hdc and a free pattern

A few weeks ago, Jessica asked me if I knew how to make a dish towel hanger for her oven handle. Every time her son dried his hands, it ended up on the floor. I'd seen dish towels with crocheted toppers, but I knew she wouldn't want permanent toppers on all of her towels. Just something to keep it in place so her kids could use it. This is what I came up with.


My first try I just used a double crochet across. But it looked a little boring. So I pulled out one of my favorite stitches--the crossed half double crochet. It's a lot more interesting than a double or half double crochet, don't you think? Here are the instructions for this stitch if you've never tried it.

Crossed Half Double Crochet Stitch

If you can do the half double crochet (hdc) stitch, you can do this very cute variation. Here's how:

Starting with any number of chains, ch 2, *sk next st, hdc in next st, hdc in previously skipped st, repeat from * to end of row. If you have a chain left, do a hdc in that st. Ch 2, turn. Repeat.


Once I got going with it, I wanted to keep using it! But seriously, how many towel hangers do we Birdies need? So I came up with a new pattern using this old favorite. This iPod or cell phone cozy was made using the crossed hdc stitch. I love the way this stitch looks with two strands of cotton yarn. Practice the crossed hdc a little, then try this fun pattern!

iPod/Cell Phone Cozy Crochet Pattern


Finished size: 3" x 4.25" (approx.)--holds a full-size iPod and many cell phones, but measure yours before making this. You can always add stitches to make it taller or wider.

Materials:
G hook, 2 strands cotton yarn (we like Lion Brand's Cotton Ease)

Okay, let's get started!

Ch 13, hdc in 2nd ch from hook and in each ch across.

Row 1: Ch 2, turn (counts as hdc). Sk 1st st, hdc in 2nd st, hdc in 1st skipped st (crossed hdc completed). Repeat across row, ending with hdc in last st. (12 total hdc)

Rows 2-20: Same as row 1.

Row 21: Crossed hdc twice (4 sts), ch 2, skip next st, hdc in next st, hdc in previous st, sk next st, hdc in next st, hdc in skipped st, hdc in last st. (This row creates the buttonhole.)

Row 22: Repeat row 2.

Row 23: Sc in each st across. Fasten off and weave in ends.

Decide which side you want to be the right side. Fold over with right-sides together at about row 10. Make sure your device will fit inside with a flap folded over the top--adjust fold if necessary.

Using your tapestry needle and a length of yarn, sew up each side. Fasten off and weave in ends.

Turn right-side out. Position button so it will fit through buttonhole and sew to front side. You're done!

So are you going to try it? Oh, you don't crochet? No worries--there are couple of these cuties in Mandy's etsy shop. And if you like them, I'll make more.


share this on »
{Facebook} {Twitter} {Pinterest}
21 Comments

Monday, January 26, 2009

it's amigurumi time!


Thanks to everyone who entered our crochet-themed giveaway for this darling amigurumi book, Amigurumi World by Ana Paula Rimoli. Without further ado, our winner is. . .

Jess Bosman of cafejessica!

Congrats! We'll be expecting to see some pics of these little cuties, Jess!

Everyone else, watch for more crochet-themed posts--we've got another free pattern coming soon!

share this on »
{Facebook} {Twitter} {Pinterest}
3 Comments

Sunday, January 25, 2009

seattle area portrait package giveaway (and coupon!)

For those of you in the Seattle area, we have a special giveaway just for you. Talented photographer Andrea of Your Every Color Photography has an eye for detail, and it comes through beautifully in every photo she takes. We love her stuff! She finds the coolest locations for shoots, and the colors in the finished product are amazing! She does it all--babies and maternity, kids, families, high school seniors, weddings, and even commercial. Plus, she offers gorgeous photo tiles and custom photo cards that are to-die-for. Check out the Holiday Card Gallery for Valentine samples. They are all so beautiful!


So for those of you in the Seattle/Everett area (or anyone willing to travel!), here are the details of the giveaway:

One lucky winner will receive $25.00 off their session fee, a FREE 8x10, and a box of 50 custom wallet size Valentines to pass out to your childs classmates, friends, and family. That's $85.00 in savings! Just leave us a comment telling us which gallery or product from the Your Every Color Web site you like best and why. All comments must be in by Wednesday, January 28 at 5:00 PM PST. Hurry--you'll want time to book your session so you can use those cute valentines!

And if you don't happen to win but still love Andrea's style, mention the Little Birdies and you'll receive $15.00 off your session fee, and a FREE 8x10 as well. Sweet!

share this on »
{Facebook} {Twitter} {Pinterest}
19 Comments

Saturday, January 24, 2009

how to find the right camera for you


“What kind of camera do you use?” I see this question pop up all the time on blogs. Everyone wants to know how they got that great shot. Sometimes the quality of the pictures can make or break a blog. As many of you know, pictures are so important. Not only do you need excellent content, you need to have great pictures to give your readers a visual of what you are talking about. We always try to take good, clean pictures of what we are blogging about so you all don’t have to guess. Also, if our pictures of craft projects don’t look appealing, would you really want to make them? Sometimes we are successful; sometimes not so much. But we do our best.

We are not camera experts and don’t pretend to be, so when David at Best In Class contacted us about his point and shoot camera comparison site page, we were intrigued. Apparently, he found our disclaimer about having a “crappy camera” quite funny. Being the nice guy that he is, he felt he had to let us know about more camera options out there. Thanks, David!

Best In Class is a product recommendation site that helps consumers find good, solid information on various products. This is great for most of us craft bloggers, because sometimes we'd just rather be crafting than researching cameras on the Internet. And we can’t all afford the super-expensive camera set up, or the time to research the best value for our money. Especially the three Little Birdies, because our crafting budget eats up almost our entire “extra” budget and then some!

These guys give the pros and cons of each camera, plus comparisons with similar models from other brands. You can even tell them which features are most important to you so you can get the right camera for your needs. If you’re looking for a new camera, it doesn’t hurt to give this site a look-see. I think the more information you have, the better off you are, right? Besides, two industry experts that choose to put pictures of themselves spending time with their kiddos on their “About Us” page are all right by me. If you do head over there, let them know the Three Birdies sent you.

share this on »
{Facebook} {Twitter} {Pinterest}
5 Comments

Friday, January 23, 2009

homemade egg rolls recipe


This summer we got together with some girlfriends for a "Wrap & Roll" party. We all brought ingredients for delicious egg rolls, spring rolls, and lettuce wraps. Of course the fun was in the chatting and eating, but it was cool to learn how to make these delicious Asian favorites.


With Chinese New Year upon us (January 26!), it's the perfect time to host your own "Wrap & Roll" party and try out our authentic egg roll recipe. Stacy's mom is Chinese, and she graciously invited us over the other day to make a couple of batches. You don't even need a traditional wok to make them--just a large frying pan will do. Besides being so yummy, my favorite part is that you can freeze the extras (before frying) and pull them out anytime!


Chinese Egg Rolls Recipe


Ingredients:
*Spring roll pastry (you can find these at most grocery stores, but the kind at specialty grocery stores are better)
*Approximately 1 lb. ground pork, chicken, or turkey
*2 carrots, grated
*2 small onions, sliced thin
*1/2 head of cabbage, sliced thin like cole slaw (you can buy a bag of shredded cole slaw w/out sauce if you prefer)
*Bean sprouts
*Other optional ingredients: small shrimp, spinach or snow peas (sliced thin)
*2 Tbsp. soy sauce
*1 tsp. sesame oil
*1 egg

1. Slice/grate your veggies very thin.


2. Brown meat until cooked thoroughly. You may want to add 1/4 c. water to pork when cooking if you have a low-fat percentage.


3. When meat is cooked, add veggies and soy sauce and sesame oil. Cook and stir 2-3 minutes--overcooking will cause your veggies to get soggy.


4. Drain veggies in a colander and let cool, or the mixture will ruin your pastry.


5. When your mixture has cooled, open your spring roll pastry. Don't open too early--they'll dry out. Also, plan on using the entire package at once. They won't keep once they're opened. Just peel off a couple at a time.

Crack an egg in a small dish and lay out a pastry.


6. Spoon some of the mixture onto the pastry wrap near the corner closest to you.


7. Wrap fast! Fold the corner up and wrap tightly around mixture as shown.


8. Dip a finger in your egg white and wet the two corners of the wrap. (This is important to keep the wrap sealed until it's fried.)


9. Fold corners over and press to seal.


10. Continue to roll, almost to the end.


11. Using more egg white, seal the last corner to the roll.


12. Repeat until all the wraps or mixture are gone. If you want to freeze some, this is the point you need to do it. Flash-freeze them on a cookie sheet for about an hour, then place in a freezer bag in the freezer. To cook them later, allow to thaw to room temp, then continue with frying instructions below.


13. Heat a few inches of vegetable oil in a deep pan. Place a few egg rolls in the oil at a time and fry until golden brown.


14. That's it! They were so easy I might just have to make them again this weekend. We like to serve them with sweet and sour sauce, but there are lots of different Asian dipping sauces out there that would be delicious also.


Bon appetit! Or should I say sihk faahn? (That means 'eat' in Chinese!)

share this on »
{Facebook} {Twitter} {Pinterest}
43 Comments
LinkWithin Related Stories Widget for Blogs